3 Tips on managing Windows 10 notifications
Microsoft has equipped Windows 10 users with a comprehensive set of tools to get their action center settings under control. Unfortunately, most desktops come with an abundance of software and features that result in more notifications. If you’ve reached the point of oversaturation, these three tips can help you better manage your action center. Overarching action center settings First of all, you should customize your Windows 10 system-wide notifications settings. To view these: Click on the Cortana icon on your taskbar and type ‘Notifications’. Click ‘Notifications & actions settings’. Here, you can turn off alerts entirely or customize the alerts for core functions such as alarms, reminders, and incoming VoIP calls. Settings for individual applications If you want to take a far more nuanced approach to your notifications, there are advanced options to create rules on an app-by-app basis. At the bottom of the ‘Notifications & actions’ setting screen is a section titled ‘Get notifications from these senders.’ By enabling any of the items in this list, you can open a new window full of more graded notifications options. From here, users can specify lock screen, sound, and priority settings for individual software. You can also adjust the amount of notifications of a particular app in the ‘Number of notifications visible in action center’ setting. To do so, click on the app’s name and select the amount of notifications you’d like to receive at any given time. Although the default amount is three, you can choose to get up to 20 notifications. Closing the blinds For users who have no interest whatsoever in the Windows 10 action center, you can banish it entirely. To do this: Open Cortana and search ‘Notification area’. Click ‘Turn system icons on or off’. Toggle the Action Center option to remove the icon from your taskbar. You can also choose which apps to remove from your taskbar entirely. To do so, click the back arrow to return to the ‘Notification area’ window and choose ‘Select which icons appear on the taskbar’. If artists have tools unique to their style, why shouldn’t the tools of your trade be tailored to your preferences? Get in touch with us today to speak with one of our tech-savvy specialists about your technology goals to start achieving new levels of productivity and efficiency on your Windows machine today. Published with permission from TechAdvisory.org. Source.
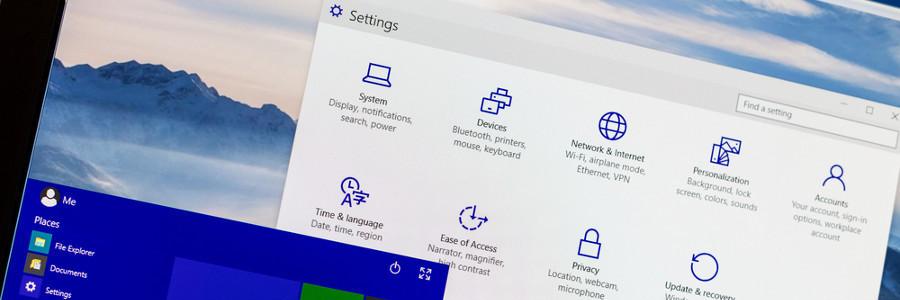
7 Ways to personalize your Windows 10
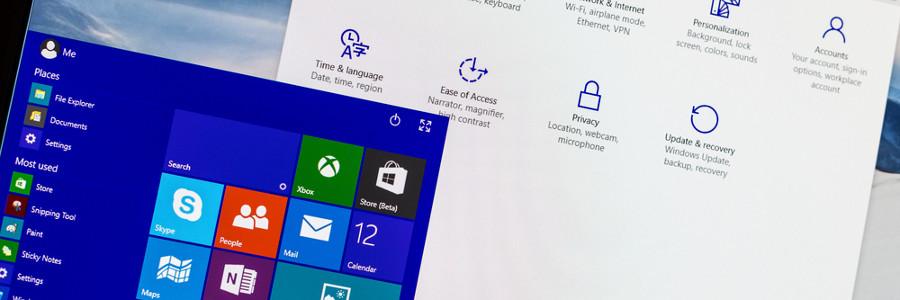
Whether you want to have a darker color scheme, run several apps at the same time, or display multiple desktops, Windows 10 gives you many options to personalize your PC. And while some customization options are less obvious than others, it is worth the effort to get your Windows 10 to look and function the way you want it to. Here are a few things you can do to personalize your PC. Change your themes The most obvious way to personalize Windows 10 is by changing your background and lock screen images. Do this by right-clicking anywhere on your desktop and choosing the Personalization settings. Here you can choose and preview different backgrounds and themes you can use. You can even add new themes by using images from your gallery or by clicking the Get more themes online option. Use dark mode Want to give your Windows 10 an edgier feel? Replace those white backgrounds with dark mode. Click on the Windows icon on your taskbar and select the gear icon for Settings. Choose Personalization and go to Colors. Scroll down until you see “Choose your default app mode”. Clicking on Dark sets your screens to dark mode. Clicking on Light, meanwhile, restores the default white background settings. Virtual desktops If you’re having trouble separating your work files from your personal files, try creating a virtual desktop. Press the Windows key + TAB to show all your open windows. At the bottom right corner of your screen, you’ll notice an option to add a new desktop. Simply click on it to create a new virtual desktop. Drag the windows you want to move to this new desktop, and immediately enjoy looking up your personal interests on one desktop while strictly doing business on the other. To quickly switch between desktops, use the keyboard shortcut CTRL + Windows key + left/right arrow. App snapping App snapping is not exactly a new feature, but with Windows 10, you can now snap any app in place. For people who like to multitask, this feature is for you. Snap any app window by dragging it into any of the four corners of your screen. You can have a maximum of four separate windows simultaneously open in your monitor, for when you want to browse the internet while you’re filling out spreadsheets and doing other tasks. Reorganize your Start Menu To add a little more “you” into your Windows PC, you can customize how your apps are arranged on the Start Menu. For one, you can resize the Start Menu by simply dragging the top or right side of the menu to resize. You can also resize the live tiles by right-clicking on them and selecting the Resize option. You can also rearrange application tiles by dragging them anywhere around the Start Menu. If you won’t be using a particular application, simply right click the tile and select Unpin from Start. On the other hand, you can pin applications to the Start Menu by right-clicking an app and choosing Pin to Start. For even faster access to apps, simply pin the programs to the taskbar. Change color themes Is the plain black Start Menu not doing it for you anymore? Just right-click on your desktop, choose Personalize > Color, and select any accent color that pleases you. Tick the checkboxes under “How accent color on the following surfaces” if you want this color applied to the start menu, taskbar, action center, and title bars. Disable notifications We don’t know where you stand on app notifications, but if you absolutely hate them and wish to never get them ever again, simply click Start > Settings > System > Notifications & Actions and switch off whatever app notifications you don’t want. Goodbye, annoying reminders. Switch up and personalize your Windows 10 however you like by using some or all of these options, and hopefully you get the settings that are just right for you. If you would like to know about more ways to personalize your desktop, or if you need information on anything Windows 10-related, give us a call and we’ll be happy to help. Published with permission from TechAdvisory.org. Source.
4 tips to speed up your Windows 10 computer for free
If your Windows 10 computer is starting to slow down after some time, there are ways to make it run faster without breaking the bank. The following tips will improve your computer’s performance without the need for more hardware. Prevent programs from launching at startup Windows loads several programs at startup so they’re quickly available. While Microsoft likely has good intentions for doing this, the auto-launch can also slow down the speed of your computer. To fix this issue, you’ll need to make some manual adjustments in the settings. To see what programs launch during startup, press Ctrl+Shift+Esc. Next, click on the startup tab of the “Task Manager” window, where you can easily disable any programs you don’t want launching at startup. However, there will likely be a few programs you’re unsure about. For those, it’s best to play it safe and keep them enabled. Get rid of useless applications Having too many programs on your computer take up valuable memory and hard disk space. They slow your computer down and make it work harder than necessary. To quickly clean out your unused programs, follow these steps: Type “Change or remove a program” into the taskbar search box (this will show you all the apps stored in your computer) Select the program/s you no longer want, and click “Uninstall”. Once you do this, you’ll then be guided through a number of steps to complete the uninstallation process. Tidy up your disks While most people like to clean out their houses come spring, why not do so with your computer sometime this month? Thankfully, Microsoft’s Disk Cleaner tool makes it easy to do so. To find Disk Cleaner, right-click any drive in File Explorer and select “Properties” and “Disk Cleanup” under the “General” tab. Once open, it will automatically find files that may be taking up unnecessary space, such as temporary Internet and system memory dump files, and present them to you for your review. Once you’ve looked them over, you can easily erase them by simply clicking “OK”. Turn off apps running in the background Much to your surprise, there are likely some programs running in the background of your Windows 10 OS that you’re completely unaware of. Microsoft has enabled their native universal apps to do this so you can quickly access their features. However, it also will slow down your CPU, so you might want to disable them. To find out what programs are running in the background, navigate to “Start Menu>Settings>Privacy>Background” apps. Then, switch off the programs you don’t want running at all times. By following these four steps, you’ll see a noticeable difference in the speed of your PC. If you’d like to learn more about how to optimize your Windows system or need assistance with your other Microsoft products, feel free to give us a call. Published with permission from TechAdvisory.org. Source.
Microsoft expands Bing’s Visual Search

How many times have you wanted to search the internet for something you didn’t know the name of? It’s a common problem that Microsoft helps solve with AI features included in its search engine, Bing. Visual Search allows users to replace text queries with images for more nuanced results and it’s now available on your smartphone. How does visual search work? Bing has indexed billions of images posted on the internet and most of them have text descriptions of some sort. This has made it possible for Microsoft to create programs that look for similarities in image contents and labels to create computer-generated definitions of everyday objects. So if you were to take a photo of the White House and upload it to Bing, the search engine could tell you what it is without any human input. Although it may seem like little more than a novelty, Visual Search makes it much easier for eCommerce shoppers to find niche products. Bing can help people identify hard-to-name items and suggest stores that sell them, such as “slip joint pliers” at a local hardware shop or “gaucho pants” at an online clothing retailer. What’s new? In June, Microsoft announced that Visual Search is now available within Bing’s iOS and Android apps, as well as Android’s Microsoft Launcher. Just open the app, tap the camera button and take a photo from your phone or choose an image from the gallery. If you’d like to narrow your search, tap the magnifying glass button and crop your image to highlight specific objects within the photo. In the near future, Visual Search will be added to Microsoft’s Edge browser and Bing.com. It’s a useful feature for finding what you need and helping customers do the same. For insight and support related to any of Microsoft’s products, give our experts a call today. Published with permission from TechAdvisory.org. Source.
The new features in Windows 10 Redstone 5

Hot on the heels of the Windows 10 April 2018 Update, also known as Redstone 4, is the highly anticipated release of Redstone 5. While no official launch date has been announced, word is that it will drop around the final quarter of 2018. What can we expect from this latest major update? 1. Windows Sets Sets takes the concept of tabs in your browsers and applies it to the whole Windows operating system (OS). It allows users to open a window with tabs for apps, files, web pages, programs, basically anything and everything. For example: You’re working on a Word document and need to go online for research. Sets will open the web page in a tab beside your Word file. Then when you create a Powerpoint presentation for your report, it appears in a third tab. Everything connected to your Word document is neatly organized in a Set. So the next time you open your Word file, a prompt will remind you of the online article, PowerPoint presentation, and all other tabs related to your document. Microsoft explained it as “content that belongs together should stay together.” 2. Cloud Clipboard Cloud Clipboard is shared across all your Windows 10 devices, so you can copy-paste between different devices. Cloud Clipboard also logs the things you copy, so you can refer back to them later. 3. Snipping Tool + Screen Sketch app The current Snipping Tool in Windows is a bit cumbersome and inconvenient for quick screenshots. Now you can press ALT + Shift + S to open the Snipping Tool from any screen. There are also new types of snips you can make: Rectangular snip — Form a rectangle (or square) around an object. Window snip — Select a window or dialogue box that you want to snip. Free-form snip — Draw a freeform shape around an object. Full-screen snip — Take a snip of the whole screen. Snipping Tool also allows you to launch the Screen Sketch app with one click, so you can immediately edit your image. 4. Dark theme for File Explorer Microsoft finally added a dark theme to its File Explorer, so you won’t be blinded when you browse in the middle of the night. 5. Improved search experience Searching for files and apps from the Windows taskbar will have a wider display window to show more content and information. It also allows you to open related documents and perform related actions. 6. Improved Your Phone app This app makes it a lot easier for iOS and Android smartphones to interact with your PC. You can send and receive SMS; and drag and drop files, photos, and more from phone to PC and vice versa. These are just some of the reasons why there’s much ado about the upcoming release of Windows 10 Redstone 5. Get ready for more updates and new features when it launches this September or October. If you need help with anything Windows-related before then, we’re always available. Give us a call today! Published with permission from TechAdvisory.org. Source.
Little-known Windows 10 tips and tricks

Are you making the most out of your Windows 10 computer? If you haven’t tried adjusting system and battery performance, silenced notifications, or used the night light function, then you’re missing out on minor but useful features. Performance/Power slider There are two kinds of computer users: those who value battery longevity and those who prefer optimized system performance. The Performance/Power slider in Windows 10 lets you easily toggle between the ‘Best battery life’ (when you’re trying to save battery) and the ‘Best performance’ (when you need your system to perform optimally), or set a balanced battery and system performance setting. Just click the battery icon in the taskbar and adjust the slider based on your preference. Night Light Those who use computers late at night can turn on Night Light to reduce the amount of blue light emitted from the screen. This feature substitutes the blue light with warmer colors, which reduces eye strain and helps you sleep easily. Night Light is disabled by default, so you need to enable it by following these steps: Click the Start Menu Click the Settings app (or press WIN + I to quickly open Settings) Click the System icon>Display Set Night light to ‘On’ or ‘Off’ Taskbar pin It takes only a few seconds to open a browser and type a website’s address or click Bookmarks and choose from a list of websites you frequently visit. But Windows 10 offers an even quicker way to access your go-to sites by allowing you to pin websites on the Windows 10 taskbar. Simply click “Pin this page to the taskbar” on the Microsoft Edge menu, and the site’s icon will appear on the taskbar for easy perusal. Drag to pin windows Need to organize your screen but can’t help having many open windows? Reduce screen clutter by dragging any window to a corner so it can take a quarter of the screen. For multiple screens, drag a window to any border and wait for the prompt that tells you to put the window in the selected corner. Focus Assist Notifications can be distracting, but Windows 10’s Focus Assist feature can manage the notifications you receive from contacts and applications. This function also lets you customize the list of notifications you wish to prioritize. To enable Focus Assist, go to: Settings System Focus Assist Adjust the notifications settings based on your preference If you wish to disable it and receive all notifications, click ‘Off.’ The features we’ve included here are just some of the many Windows 10 functions that save time and add value to business-users’ lives. For more software and productivity recommendations, give our IT consultants a call today. Published with permission from TechAdvisory.org. Source.
Setting up your new laptop with Windows 10

First things first, what should you do with your brand new laptop? You go through the Windows 10 setup, and you’re all done, right? Not really. Your notebook isn’t ready — until you do some tweaking. Let’s get the ball rolling. #1 Check for updates Your new laptop should check for updates automatically, but you can also check manually. Just click the gear icon above the Start button to go to the Settings, choose Update & Security > Windows Update and then click the Check for updates button. (Or, just type “updates” into the search box and click Check for updates.) #2 System restore If something goes wrong with your laptop, you can save a lot of time and hassle if you have a “restore point,” which is like a backup of your entire operating system. To set up a restore point, search for “restore” from the taskbar and click Create a restore point. You’ll be taken to the System Protection tab of the System Properties window. From there you can choose what you want to be included in the back and then click the Configure button. Select the radio dial to Turn on system protection if it’s not already on. And then you can choose how much disk space to reserve, usually no more than 2 or 3 percent. #3 Power plan If you want to prolong your laptop’s battery life, one of the best things you can do is switch the Power Saver, High Performance, and Balanced power plans based on your needs. To choose a plan, right click the battery icon in the lower-right corner of your screen and click Power settings. Next, click Additional power settings to select a power plan. #4 App installation tolerance level To restrict which apps can be installed on your laptop, you can disallow anything that isn’t in the Windows Store. Go to Settings > Apps > Apps & features and you can choose whether to permit installations from only the Windows Store, any app installations (with a warning), or unrestricted app installations. #5 Remove bloatware Vendors package new laptops with lots of trial apps, which are mostly unnecessary and unwanted software called bloatware. Windows 10 offers an easy way to see which apps are installed on your new laptop and a quick way to uninstall those you don’t want. Head to Settings > Apps > Apps & features and peruse the list. If you don’t want an app and are 100% certain your computer doesn’t need it, click the Uninstall button. #6 Anti-ransomware Ransomware is a form of malicious software (or malware) that makes all your data inaccessible until you pay a fee to hackers. To combat it, type ‘Windows Defender Security Center’ into the search bar at the bottom of your screen, click it and go to Virus & threat protection > Virus & threat protection settings. Here, you’ll be able to enable a new option called Controlled folder access, which protects you against ransomware attacks. By default, the Desktop, Documents, Music, Pictures, and Videos folders are protected, but you can add others too. Do you know what settings to change and update to optimize your laptop? This article barely scratches the surface of Window 10’s security and efficiency settings. Call us today for quick chat with one of our Microsoft experts about taking yours to the next level. Published with permission from TechAdvisory.org. Source.
Windows 10 makes it easy to back up files

Businesses rely on computers for their daily operations, so getting afflicted by ransomware is devastating. It blocks access to all data, which can result in financial losses and the company closing down temporarily or permanently. Fortunately, Windows offers built-in tools and cloud storage options so you won’t have to fear data loss. File History Is Back for Windows 10 Users would be glad to know that Windows brought the same functionality of File History from Windows 8 (and 8.1) to Windows 10. Apart from the slight design changes, there really isn’t much difference, which is fine. Serving as the main backup utility, File History enables users to regularly schedule backing up of files on their PC and store them on an external drive. That means you can connect your PC to a network or USB drive and make backups as needed. However, you must be sure to regularly connect the external drive if you opt to set File History to back up to it. Otherwise, Windows will prompt you that your files have not been backed up for every day that you forget. You can neglect this warning at your own risk. If you back up to a mapped network that is unavailable, File History will back up to the local disk, until the network drive becomes available. Setting Up File History Turning File History on is not rocket science. After all, it was designed to make data backup and recovery easy for users. By default, File History backs up the main file folders, but you may also pick which folders you want to back up and bring in folders from other parts of the PC to back up. From the Start menu, click on Settings > select Update & Security > click on the Backup section You will see an option for Back Up Using File History. Below it is an option to Add A Drive. Click on + to see a list of external hard drives connected to your PC and choose one. When you return to the Backup section, you will see that the Add A Drive option has changed to Automatically Back Up My Files (by default). This allows backups to be created at periodic intervals, which you can set to anywhere from every 10 minutes to once a day (default option is once every hour). You may also set how long to keep the backups (default option is forever). Restoring files that have already been backed up is just as easy. Simply click on the Start menu and type File History in the Search bar. Then, you will see the Restore Your Files With File History option. Select this, and a new window showing the folders backed up onto your external drives will appear. A word of advice: Be sure to back up files using a network drive or the cloud, not locally. Making System Image Backups Backing up your entire operating system, along with all the programs, settings, and files, is possible with Windows 10. To use this feature, you need to access the Backup and Restore (Windows 7) option from the Control Panel. Click on Create a System Image and choose where to store the backup (external hard drive, network drive, or DVD) and which drives to back up. You will then be asked to make a system repair disc which you can use to start a PC and restore the image backup. Setting Up Your OneDrive Backup Option Use OneDrive to store and sync your files in the public cloud. While it isn’t exactly a backup solution, OneDrive can serve as a destination for your backups. Microsoft offers plans ranging from at least 5 GB to 50 GB (monthly) and 1 TB (yearly) of storage space. Published with permission from TechAdvisory.org. Source.
Easy Steps to Create More Space on Windows 10

Hard drive space is a top priority for Windows 10 users. Techies who use budget computers navigate with limited storage or with Solid-State Drive (SSD). Having little disk space obstructs the free flow and enjoyment of using the hard drive, so you need more storage space. Here are some tips to free up your disk. Delete junk on Files Windows 10 includes a feature to help you create more space by erasing unnecessary files. In some cases, this feature can find and remove several gigabytes of unnecessary system files. To use the feature: Open SETTINGS and click SYSTEM. Click STORAGE Scroll down and select CHANGE HOW WE FREE UP SPACE Under TEMPORARY FILES, select the files to be deleted including temporary files, downloaded files, and items in the recycle bin. Under the FREE UP SPACE NOW, there is an option that lets you delete an older Windows 10 version. Click the CLEAN NOW button to free up space. Use Disk Cleanup This is a similar but slightly different tool for sniffing out unnecessary files that are taking up too much space. To give it a try: Open any desktop folder. Right-click on THIS PC in the pane on the left, then select PROPERTIES. Click the DISK CLEANUP button, then CLEAN SYSTEM FILES. The Disk Cleanup tool gives you a number of options, many of which you should consult with us before deleting. They include: Windows Update Cleanup, Downloaded Program Files, Temporary Internet Files, Recycle Bin, and Temporary files, among others. Click OK, then click DELETE FILES. Delete applications and games Consider uninstalling apps that are rarely or never even used. These include bloatware or pre-installed programs. You may not even realize certain games or applications are taking up hard drive space. To remove them: Open SETTINGS, then click APPS. Click APPS & FEATURES. Select the apps and games you feel comfortable removing, then click UNINSTALL. Use “OneDrive Files” On-Demand feature A new Windows 10 tool, OneDrive allows access to files in the cloud using File Explorer. This means your files will be stored in the OneDrive cloud and won’t take up hard drive space unless you need to download them for offline editing. Open the OneDrive application. Right-click the OneDrive icon in your task bar, select SETTINGS, and click the SETTINGS TAB. Under FILES ON-DEMAND, check SAVE SPACE AND DOWNLOADED FILES AS YOU USE THEM. Click OK. Copy and paste your documents to the OneDrive folder (located in the left-hand pane of the File Explorer), select all of them, right-click the selection, and select FREE UP SPACE. Lastly, move apps, games, and other files to an external hard disk so the computer can create more internal space if there is an extra need for more storage on the Windows 10 device. All these tips are user-friendly, but if you need to give your Windows 10 machines a serious overhaul, give us a call now. Published with permission from TechAdvisory.org. Source.
The top 4 new features in the Windows 10 update

Microsoft has claimed that Windows 10 will be the final version of the world’s most popular operating system. Instead of bundling new features into a new Windows release, Microsoft has been issuing free updates to the current version since 2015. The latest update is almost here, and it comes with some exciting improvements. Timeline Replacing the Task Viewer icon that sits along the Windows taskbar, Timeline lets users view their desktop’s activity history. When users click the icon to the right of the search icon located on the taskbar, they will see all the applications that are currently open. Scroll down and Windows will display documents, photos, videos, and folders that are organized by when they were last used. Can’t find the file you were working on last Wednesday? Scrolling to that date in Timeline will be the quickest way to track it down. Nearby Sharing This simple feature makes it much easier to transfer files between Windows devices. After enabling Nearby Sharing from the Control Panel, click the Share button in the Edge browser or Photos app and select the computer you want to receive the file. Users can also right-click any file and select Share. The computer receiving a file will display a notification for users to accept or decline the transfer. This means file transfers can finally take place without empty email messages, unreliable network folders, or beat-up USB drives. Swift Pair Want to make a call from your desktop with a pair of wireless headphones or test out a wireless keyboard? Just turn on a Bluetooth device within range of your desktop, and Windows 10 will automatically detect and notify you of the connection opportunity — all you need to do is click Connect. Privacy If you’re concerned about information being collected from your business’s computers, the brand new Windows Diagnostic Data Viewer will tell you everything you need to know. Users can now view what information Microsoft receives from their computer and fine-tune privacy settings related to browser history, connected devices, application usage, and webcam permissions. Scheduling your update It’s hard to know exactly when your Spring Creators Update will be ready to install, so it’s a good idea to brief your staff on how to minimize business interruptions that the update might cause. Windows 10 updates can be installed immediately, “Snoozed,” or rescheduled, so start thinking about which would be best for your office. Beyond these impressive new features, Microsoft’s updates come with invaluable security protections. If you’re having trouble keeping your Windows devices secure and running smoothly, give us a call today. Published with permission from TechAdvisory.org. Source.